 Getting ranked in major search engines is all about making those search engines happy. You want Google to see you making efforts to give your users the best possible experience, and in turn reward you for those efforts. In a perfect world, this call-and-response style of search engine optimization (SEO) happens flawlessly.
Of course, we don’t live in a perfect world. In many cases, webmasters don’t do enough to improve their authority or over-optimize to the point where they are penalized by search engines rather than rewarded. And in still other cases, marketers execute an SEO strategy flawlessly, with great onsite content and a perfect offsite authority-building strategy, but they still struggle to achieve their deserved ranks. What could be responsible for this discrepancy?
The answer, in most cases, is that Google can’t see what you’re doing. It’s the second part of the equation, and therefore the one most often overlooked. It’s easy to assume that
Google is able to crawl and index all the material on your site or pointing to your site, but crawl errors are real, possible, and can be extremely damaging.
Fortunately, there’s good news for marketers. Google is well aware that simple, innocuous crawl errors can damage the reputation of otherwise well-abiding sites, and has taken action to help webmasters and marketers prevent and correct these errors when they do come up. They’ve even made a specific toolset for this exact purpose, available for free in your Search Console account.
In this article, I’ll tell you exactly how to find and fix any crawl errors preventing your site from being seen or found in Google. First, of course, you’ll need a Search Console account—so set one up if you haven’t already.
Judging the Status of Your Site
First, you’ll want to think globally. Depending on the size of your site and the type of team you have running things, it’s highly likely that if your entire site goes down, you’ll be able to catch it immediately. However, some smaller or less knowledgeable teams might not be able to detect a down website until days after the initiating event—and even then, they might not know how to take corrective action. Until your site is back up, Google won’t be able to crawl any of your pages, so take corrective action quickly.
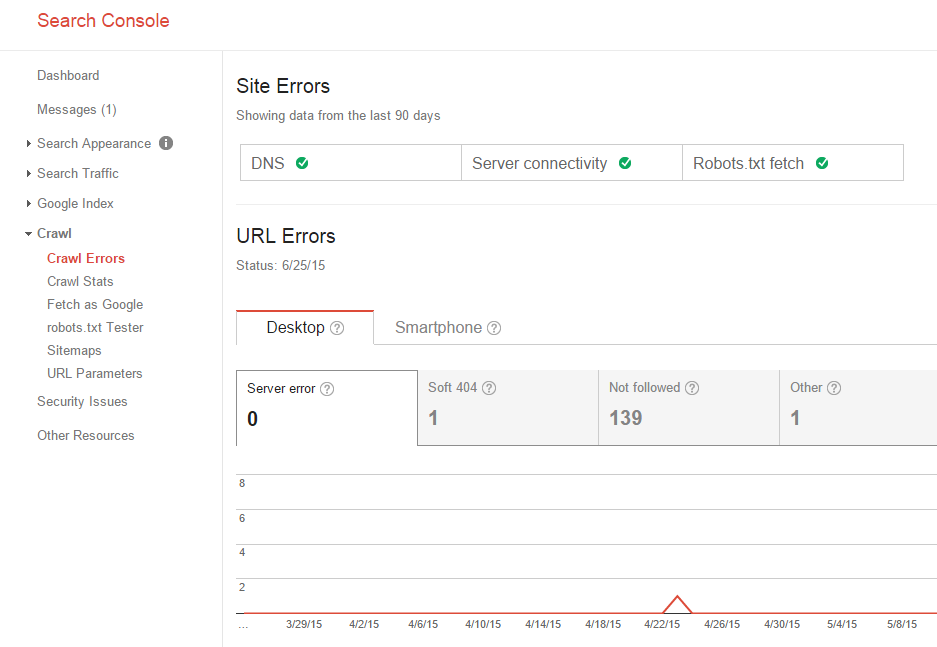
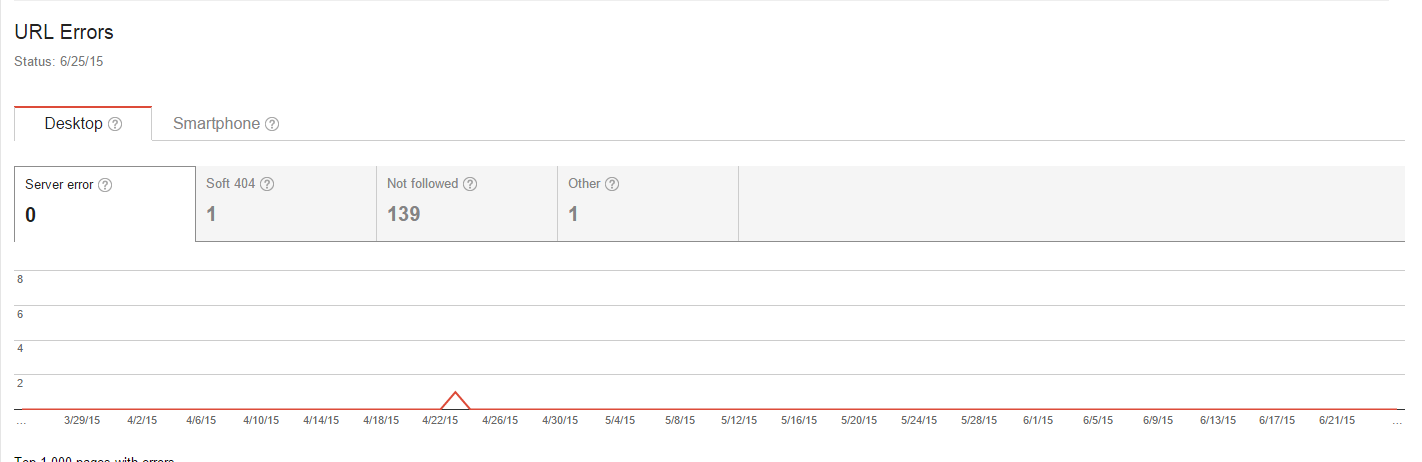
Once logged into Search Console, check out the “Crawl” submenu, and click on “Crawl Errors.” Here, you’ll be able to see three different status headings—DNS, Server Connectivity, and Robots.txt Fetch. If you see a green checkmark next to one of these, you know that’s not the problem. If you see one of these checkmarks missing, you know exactly where to start with your efforts to restore the site.
Checking for Crawl Errors on a Page Level
You’re going to remain in the “Crawl Errors” section for this important step. In this process, you’ll detect and identify any page-level crawl errors that are preventing Google from seeing the content on your site. These errors are extremely common and difficult to notice, making them notorious for negatively affecting rank.
Scroll down to “URL errors” and you’ll see 90 days’ worth of data on the health of your site. There are several types of errors reported here, but the most common culprits are 404 “not found” errors. 404 errors occur in a number of situations – you could have changed your page layout without setting up redirects, you could have taken a page down, or you could have a new navigation where pages are named differently.
Whatever the case, export a list of your individual page errors and set up a 301 redirect for each one, redirecting traffic and search crawlers to a new, appropriate URL.
Indexing Errors
Once you’ve taken care of any broad site or page-level errors interfering with Google crawling your website, you’ll need to ensure that Google is accurately indexing your pages. To do this, you’ll need to compare your list of actual onsite pages (i.e., your sitemap) against what Google lists as your indexed pages.
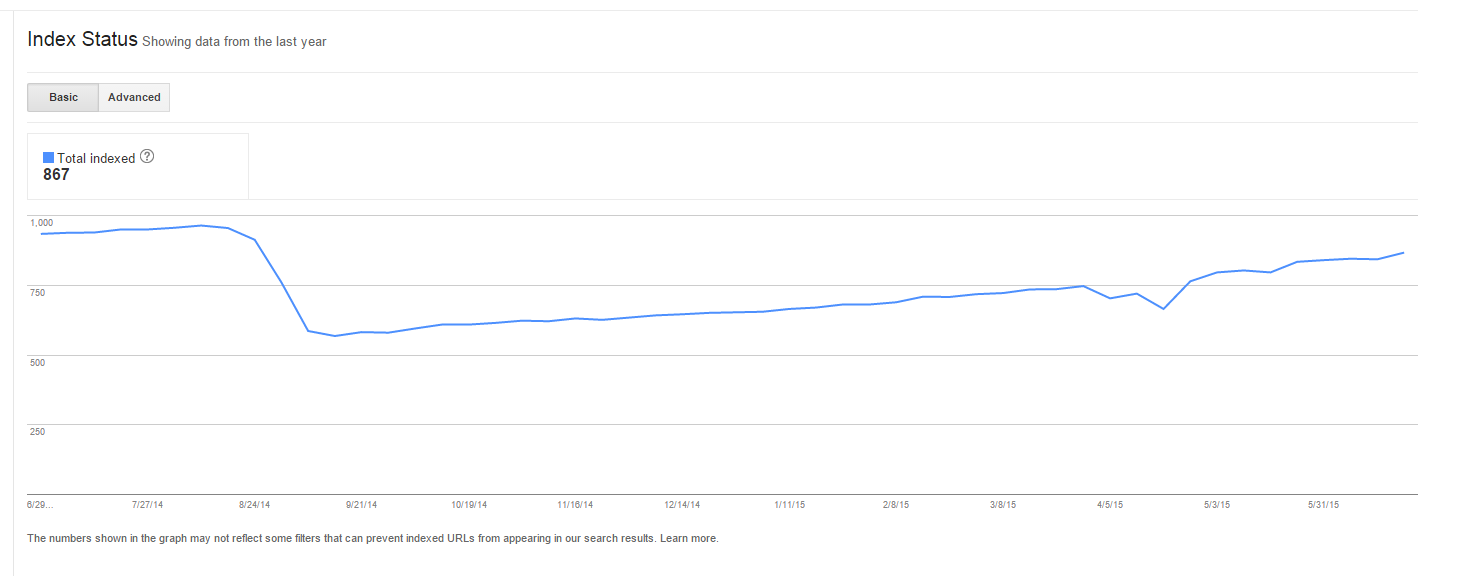
First, grab your sitemap, then head to “Google Index,” and then “Index Status.” In the Basic view of Index Status, you’ll be able to see the trend indicating the number of pages Google has indexed on your site over time. If you see any major drop-offs or if the number of indexed pages significantly differs from the number of pages in your sitemap, you may have an indexing problem. Google has a handy checklist for what to do if one of your URLs isn’t indexed.
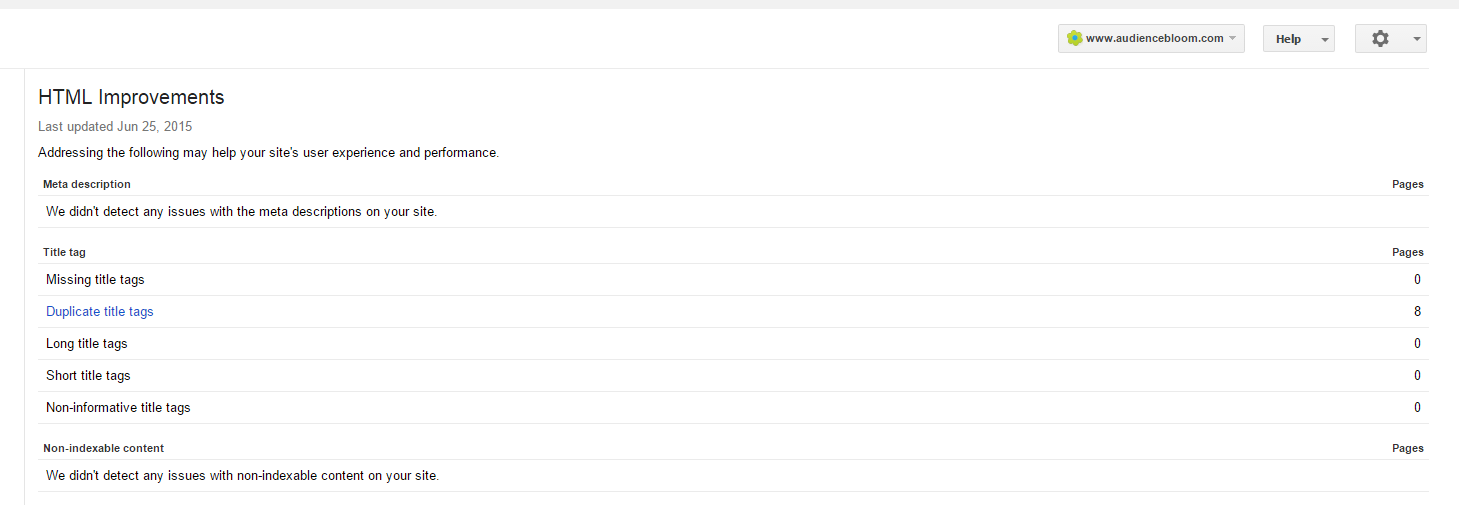
Side Note: Issues With Meta Data
Meta Data errors aren’t necessarily crawl errors, but improper data indexing can seriously hurt your rankings. In Search Console, swing by the “Search Appearance” submenu and find “HTML Improvements.” This section will detail any discrepancies in your meta information, including whether your title tags or meta tags are too long, too short, or are duplicates of other meta data pieces on your site. If you find errors here, and you likely will, take the time to correct them. In most cases, adjusting a few words is all it takes to iron out the discrepancy.
In most cases, crawl errors are minor and hardly noticeable, but when accumulated, they can seriously damage your rankings. Even if you keep your site in relatively organized order, make it a point to occasionally log into Search Console and check for any crawl, indexing, or meta data errors that are interfering with your rank. This general site upkeep can help maintain your authority and give you a chance to make quick corrections in the event that something goes wrong.
No comments :
Post a Comment